Summary
1-2 hours
1-2 hours
Automaton, machine
Sabine De Brabandere, PhD, Science Buddies
Introduction
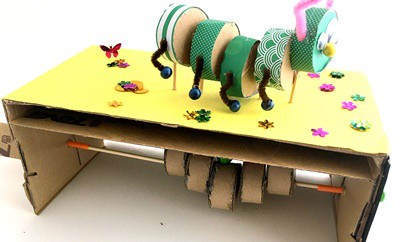
Have you ever wondered how to create art with moving parts using nothing but cardboard, a few skewers, and some craft supplies? In this fun STEM activity, you will build an automaton, a machine that makes parts appear and disappear, move up and down, spin in circles, or all of these together. The instructions will show you how to build a moving caterpillar, but you can use your imagination to build any other animal or object you want!
Materials
-
Cardboard
-
Cardboard box; an old shoebox works well
-
Cardboard tube or toilet paper rolls
-
Cardstock or paper
-
Scissors or utility knife
-
Tip of compass or needle
-
Glue
-
Drinking straw
-
Skewers, at least one that is 2 inches longer than the shoebox
-
Beads with smooth surface
-
Pencil
-
Materials to color and decorate your creation
Instructions
The procedure will walk you through building a caterpillar automaton. The body of the caterpillar consists of five short cylinders. Turning the axle makes these parts move up and down.
You can use the procedure to make this automaton or choose to have other objects move up and down. At the end of the procedure, some mechanisms that create other movements — turning objects, or objects that suddenly drop down — are shown. Whatever your design idea, be sure to look for solutions whenever you get stuck, keep trying and enjoy the process!
Create the Case
-
All automata have three parts; a mechanism that drives the movement, a case that houses this mechanism, and the showcase parts that move. A cardboard box is used to houses the mechanism of this automaton.
-
Lay the skewer on top, parallel to the long side of the box. The skewer should stick out at least two inches. If not, look for a shorter box or a longer skewer.
-
The caterpillar or its substitute will sit on top of the cardboard box. Check that the height of your box is at least one inch more than twice the diameter of your cardboard tube. If your box is too low, glue new longer cardboard side panels to the box to make it higher.
-
If the box has a lid, remove It. You can use the cardboard lid later.
-
Place the box open side down in front of you. The side facing up will support the automaton.
-
The box will hold the mechanism that drives the movement. Cut out the side of the box facing you so you can easily access and see the mechanism once it is installed.
-
Optional: Cover the top of the box with decorative paper.
-
Cut out a piece of cardboard similar in size to the top panel of the box. This piece should snugly fit inside the box when it is placed parallel to the top panel of the box. It will be used to keep the moving pieces upright. Trimming the lid of the box often works well. -
Draw a pencil line on the box where you want the moving objects to be placed. Place it about midway and parallel to the front of the box. Extend the line to the side panels. Your driving axle will be under this line. -
On each side panel, mark a point directly under the line you drew in step 9. It should be one cardboard tube diameter from the bottom edge of the box.
-
Make a hole at those points (one in each side panel) and glue a 1 inch section of drinking straw in the hole.
-
Thread a long skewer through these straws and make sure it spins easily without getting stuck. This rotation will drive the movement of your automaton.
Build the Driving Mechanism
The caterpillar has five body parts that can independently move up and down. Each of them is driven by a short cylinder.
If your design has more or fewer moving parts, create the same number of cylinders as you will have moving parts, and thread them all on the axle.
- Create ten identical cardboard circles the size of a cross-section of the cardboard tube. These will become the top and bottom faces of the five short cylinders.
- Cut five sections about 3/4 inch long from the cardboard tube.
- Draw a diameter (the line that cuts the circle into two equal pieces) on half of the circles and measure its length. Draw a dot at a quarter of the diameter’s length from the edge on three circles. Draw a dot at center of the circle on two other circles. For example, if your tube has a diameter of two inches (like most toilet paper tubes), you draw a dot 1/2 inch from the edge on three circles and at 1 inch on two more.
- Make five stacks of two flat circles, each with a circle marked with a dot on top of an unmarked circle. Align the two circles well and pierce a small hole through both circles on the dot you just drew. The tip of a compass or a needle are helpful tools to make these small holes.
- Take a stack of circles where the hole is off-center. Thread a circle, a piece of cardboard tube, and the second circle onto the skewer.
- Glue the two circles to the piece of cardboard tube, but do not glue them to the skewer yet.
- Repeat steps 5–6 using circles that have holes in the center.
- Continue repeating steps 5–6, alternating between centered and off-center circles. You should now have five short cylinders threaded on a skewer. This skewer will be the axle.
- Place the axle with cylinders in the box so it rests in the pieces of straw. Spin it and watch how the rotation of the axle makes the cylinders rotate. Skewers holding a section of the caterpillar’s body will rest on these cylinders.

What difference do you notice between the centered and off-center cylinders? How do you think the rotation of the axle will generate up and down movement of the body parts? Which sections, if any, do you expect to move most?
- Spin the cylinders on the axle so their tops make a V shape when viewed from the side.
What type of movement of the body parts do you think this V shape will create?
- You will finish the moving mechanism once everything is in place and all fine-tuning has been done.
Create the Caterpillar or the Moving Object
-
The caterpillar consists of five short cylinders. These cylinders do not need to be as sturdy as the ones you use for the driving mechanism, but you want to make them look nice. You can make these cylinders by cutting pieces of a cardboard tube as described in the previous section, or, if you lack a cardboard tube with the diameter you want, glue a strip of cardstock between each pair of circles.
-
Decorate the top of one piece to represent the face of the caterpillar. Details can be added at the end, but decorating is easier when you can place the cylinder flat.
-
Place the driving axle on top of the box, with the skewer parallel to the pencil line you drew in step 9 of the Create the Case section. The axle should stick out about 1/2 inch of one side of the box, and more on the other side.
-
If needed, slide the cylinders on the skewer right or left so their position matches the location you want for the moving piece of your caterpillar’s body.
-
With pencil, mark the middle of each cylinder on the line on the box. This is where the skewers that hold the caterpillar will poke out of the box.
-
Move the extra piece of cardboard that you cut in step 8 of the Create the Case section so it is pressed against the top of the box.
-
Pierce the box and the piece of cardboard with a needle or the tip of a compass on the five marked spots.
-
Enlarge the holes by pushing a skewer into them. Move the skewer up and down and wiggle it a bit to widen the hole. These skewers will need to move up and down smoothly. If the holes are too narrow then they will get stuck, but if the holes are too wide, then they will not stay upright.
-
Thread your driving axle through the drinking straws. Align it so the cardboard cylinders are directly below the holes in the top of the box.
-
Move the extra cardboard piece down about 1 inch. Rotate the skewer to make sure the cylinders still rotate freely, with about 1/4 inch of free space between each cylinder (in any position) and the piece of cardboard. Glue the piece of cardboard to the box.
-
Place skewers through the holes and let them rest on the driving cylinders. These skewers will hold the body of the caterpillar. Determine how long they need to be by looking at the one that sinks in the least. Mark that skewer at two inches above the top of the box and cut it to that length.
-
Remove the driving axle from the box.
-
Cut four more pieces of skewer to the same length as the one you cut in step 9.
-
Glue the top 1 inch of a skewer to a flat side of a piece of the caterpillar’s body. Repeat until each piece of the caterpillar’s body is attached to a skewer.
-
Place the skewers holding the body parts in the holes, one skewer per hole. Remember to place the head piece on an end.
-
Glue a bead on the lower end of each skewer. The bottom end of the bead must have a smooth surface so it can glide over a driving cylinder.
-
Put the axle back in place.
-
Let each bead rest on a cylinder. Glue a bead to the end of the axle that sticks out just a little, so that when the bead is pressed against the straw, the beads on the five skewers rest in the middle of each driving cylinder. Shift the driving cylinders along the axle if adjustments are needed.
-
Turn the axle and see how the body parts move.
-
Turn the middle cylinder so three cylinders point up and the tops of the 5 cylinders form a W shape. Rotate the axle again.
How does this change modify the movement of the body parts?
-
Experiment with putting the cylinders at different positions with respect to each other, and see which position works best for your design. For the caterpillar, we placed the cylinders so the top parts make a V shape.
-
Once you have found a configuration you like, glue the cylinders in place on the axle.
-
To make a handle on your axle, cut a rectangle from cardboard, fold it in two and glue it on with the axle sandwiched between the folded cardboard.
-
Turn the driving axle and watch how the pieces move up and down.
What makes a piece move up and down? Do all the pieces move the same amount? Why or why not? What would need to change in the design to make a caterpillar where all the pieces of the body move a lot?
-
Finish decorating the caterpillar.
How to Make Other Movements
-
Different driving mechanisms generate different movements.
What motions do you think result from the mechanisms shown in the picture?
What Happened?
The head, middle, and end pieces of your caterpillar probably moved up and down the most, while the other two pieces moved very little. This happens because of the way the driving mechanism of this caterpillar was designed.
The driving mechanisms of this automaton consisted of five cylinders; two placed centered on the axle and another three placed off-center. Each skewer holding a piece of the caterpillar’s body rests on top of one of these five cylinders. The tops of the cylinders that are centered on the axle do not change in height. They always stay about the same distance from the axle, so that body pieces resting on these cylinders do not move much. The tops of the three cylinders that were threaded closer to the edge of the cylinder move a lot. Sometimes, it is very close to the axle, and half a turn later, it is further away from the axle. This results in a body part that makes a larger up and down motion.
When you use a spiral-shape drive piece instead of a cylinder, you can create a gradual upward movement followed by a sudden drop. A mechanism that has two cylinders perpendicular to each other can make an object spin in circles instead of move up and down. If you keep exploring, you can even find mechanisms that make objects move forward and backward.
Digging Deeper
An automaton is a machine that follows a predetermined set of movements. Some are powered by
wind or water, the one described in this activity is powered by a human turning a handle.
Automata are not new. The word “automaton” originates from the Greek language and means “acting of one’s own will.” References to automata appear in Greek mythology, Jewish legends and ancient Chinese texts. Most automata were and are made to impress and entertain people, they are works of art. But recently, NASA has proposed an automaton, the
Automaton Rover for Extreme Environments (AREE) powered by wind for practical reasons. It is designed to work on Venus, where surface temperatures reach at least 462 °C (864 °F).

Ask an Expert
Curious about the science? Post your question for our scientists.
For Further Exploration
- Make an automaton that uses one of the other driving mechanisms or look up more complicated driving mechanisms and try them out.
- Make an automaton to decorate a scene from your favorite child’s book.
- This automaton was made of cardboard. Can you make one of wood, of metal wire, or recyclable materials?
- This automaton was powered by a human turning the axle. Can you make one that is powered by a stream of water or the wind?
Project Ideas
In this engineering challenge, you will build a car powered by nothing but a rubber band. The farther the car goes, and the fewer materials you use to build it, the higher your score. Enter your score in the 2024 Science Buddies Engineering Challenge for a chance to win prizes! Teachers, lesson plan versions of this challenge are also available.


Do you like drawing or painting? What if you could build a robot that creates its own art? In this project, you will create your own Art Bot, a robot with markers for “legs” that wobbles across a piece of paper, creating drawings as it moves. You can then customize your robot to change how it draws. This is a beginner-level project with no robotics experience necessary, so if you want to try building your own robot, this is a great place to start!

A simple circuit and a servo motor are all you need to turn any work of art into an interactive moving creation that is happy to see you. Light sensors see your shadow as you walk past your artwork and make a servo motor move back and forth. Waving arms? Turning heads? It is all up to you!
Activities
STEM Activity

Have you ever wished you could copy a drawing but make it larger or smaller? If you’ve tried to create a larger or smaller copy of your work, you’ve probably realized that it is very hard to get the details right. A machine called a pantograph, however, could help. It makes copies that can be scaled up or down or made the same size. In this activity you will make your own pantograph and then duplicate your drawings. Can you figure out how it enlarges, shrinks or turns drawings upside down?
STEM Activity
Did you know that gears are all around you? You can find them in wind-up toys, bicycles, carousels, cars and trucks, cranes, drills, wind turbines, analog watches, and so forth! If you’ve looked closely at a moving bicycle, you have seen gears at work. Are you curious about their purpose? In this activity you will use candy to make gears and explore why they are so versatile.
STEM Activity

The Archimedes screw is an ancient device used to lift water from one location to another. They are so useful that they are still in widespread use today! After a quick trip to the hardware store, you can build your own Archimedes screw in this fun activity.
STEM Activity

Do you like arts and crafts? How about making sculptures with Play Doh® or modeling clay? Imagine how cool it would be if you could add lights to your creations? That is exactly what you will get to do in this activity! Keep reading to learn how you can make any light-up sculpture you imagine, such as a house with lights in the windows, an animal with light-up eyes, or a colorful butterfly.
STEM Activity
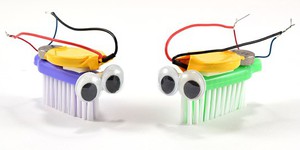
Do you think you could build a robot on the head of a toothbrush? Bristlebots are simple, tiny robots that buzz around like bugs. They are easy to build and fun to play with, and you do not need any previous experience with robotics to make one. You can even build two bristlebots and race them against each other! Move on to the Materials section to see what parts you need to build bristlebots, and the
instructions for step-by-step directions on how to build them.
STEM Activity

Brushbots are a simple, fun type of robot that you can build out of arts and crafts materials. They are easy to build and you do not need any previous experience with robotics. You can build them yourself, build two robots with a friend and race them against each other, or even make them sumo wrestle! Go to the Materials section to see what parts you need to build a brushbot, and see the instructions for a step-by-step guide on how to build one.
Careers
Career Profile

Mechanical engineers are part of your everyday life, designing the spoon you used to eat your breakfast, your breakfast’s packaging, the flip-top cap on your toothpaste tube, the zipper on your jacket, the car, bike, or bus you took to school, the chair you sat in, the door handle you grasped and the hinges it opened on, and the ballpoint pen you used to take your test. Virtually every object that you see around you has passed through the hands of a mechanical engineer. Consequently, their…
Career Profile

You use mechanical devices every day—to zip and snap your clothing, open doors, refrigerate and cook your food, get clean water, heat your home, play music, surf the Internet, travel around, and even to brush your teeth. Virtually every object that you see around has been mechanically engineered or designed at some point, requiring the skills of mechanical engineering technicians to create drawings of the product, or to build and test models of the product to find the best design.
Career Profile

If you’ve ever watched a cartoon, played a video game, or seen an animated movie, you’ve seen the work of multimedia artists and animators. People in these careers use computers to create the series of pictures that form the animated images or special effects seen in movies, television programs, and computer games.
Career Profile
One of the basic truths in the universe is that objects tend to go from a state of higher organization to a state of lower organization over time. In other words, things break down, and when those things are precision instruments or equipment, they require the services of very specialized technicians to restore them to their working order. Precision instrument or equipment technicians often combine a love of music, medicine, electronics, or antiques with delicate mechanical repair work.
Career Profile

Industrial engineering technicians and technologists work in a lot of different places. They work side by side with engineers to set up and fix processes and machines. Do you like to work with puzzles? If so, you could apply problem solving skills to helping companies improve the way they make products or serve customers. Whether you’d like to work in a factory, office, repair shop or healthcare organization, there is a place for you as an Industrial Engineering Technician or Technologist.
Career Profile

Machinists and tool and die makers set up and operate machine tools to make custom metal parts, instruments and tools. These tools and parts go into machines that are needed to help keep factories and machines running smoothly. A machinist may read drawings or blueprints to set up and operate machine tools. A machinist can monitor machine tools but also can work with their hands to shape parts to specific measurements. A tool and die maker can create and fix metal forms that make metal or…
Career Profile

A medical equipment repairer, or medical equipment technician, has an essential role in the fields of healthcare and engineering. From X-ray machines to electric wheelchairs, the medical equipment repairer can fix a wide array of machinery used in hospitals and clinics. They have detailed knowledge of how machines and instruments are to be maintained, how they function, and how to repair them. Broken medical equipment costs hospitals and providers time, money, and may pose safety risks for…
Career Profile

An industrial production manager is like the leader of a team that makes things in a factory. They plan and organize how things will be made, make sure everyone knows what to do, and check that everything is working correctly. They also make sure the things being made are good quality and safe. If there are any problems, they figure out how to fix them so that production can keep going smoothly. It’s a bit like being the captain of a sports team, but instead of playing games, they help make…